
To ensure secure sign-in and streamline workforce identity management, AWS IAM Identity Center plays a crucial role. It provides a centralized hub to create or connect workforce users, allowing you to manage their access across all AWS accounts and applications from one place. This simplifies access control, making it easy to assign multi-account permissions. Additionally, you can connect various applications to the IAM Identity Center and grant users access by enabling cloud apps, custom apps, and SAML 2.0 integrations.

Enable IAM Identity Center
Log in to the AWS console, go to the IAM Identity Center, and switch to Asia Pacific (Sydney) to enable this service.

When you click the “Enable” button, the AWS Service will require AWS Organizations

After enabling, you should follow the setup steps to configure your IAM Identity Center.

Go to Settings, go to the tab “Identity source,” and click “Action” -> “Change identity source.”

After that, you can have three options for your Identity source.
- Identity Center directory: You need to manage your workforce in the IAM Identity Center, and Users sign in through the AWS access portal.
- Active Directory: If your organization already has accounts in Active Directory and you want to sync your account to the IAM Identity Center, this is the solution you need to choose.
- External identity provider: You can manage your workforce in another Identity provider (IdP), and when you allow them to use your AWS resources, they will need to sign in to your IdP sign-in page, and the page will redirect them to the AWS access portal. After that, they can have tokens to access resources. Technically, this option uses SAML authentication.

In this blog, we will use the “Identity Center directory” for the demo.
Set up AWS Accounts for the AWS Organization
We can use the AWS Organizations service to manage your organization. In this service, we can add multiple AWS Accounts for many separate purposes (for example, Account, Finance, Development, Marketing, etc.)

Create Permission Sets
We will need to create Permission Sets to assign to specific AWS Accounts. After that, we will assign these Permission Sets to specific AWS Accounts. One AWS Account can have 0 or many Permission Sets.
In the Permission sets, we can choose from “Predefined permission set” or “Custom permission set” as business needs.

Create Users and Groups
In the IAM Identity Center, we need to create Users and Groups. Besides that, we should assign the user to 0 or many groups. As a result, one user belongs to 0 or many Groups.

Assign Groups to AWS Account
After creating Groups and Permission Sets, we can choose an AWS Account to assign a specific group to account. In the process, we will choose at least one Permission Set to assign to the Group. Finally, we will have groups with specific Permission Sets under the specific AWS Account. As a result, one AWS Account has 0 or many User Groups, and a User Group has one or many Permission Sets.

Full Picture of IAM Identity Center
In conclusion, we have a complete picture of the AWS IAM Identity Center.

Test your AWS IAM Identity Center
Follow Install or update the latest version of the AWS CLI – AWS Command Line Interface (amazon.com) to set AWS CLI.
After that, run command to check AWS CLI
aws --verison

Now, we can set up an AWS profile to test your AWS IAM Identity Center.
aws configure sso
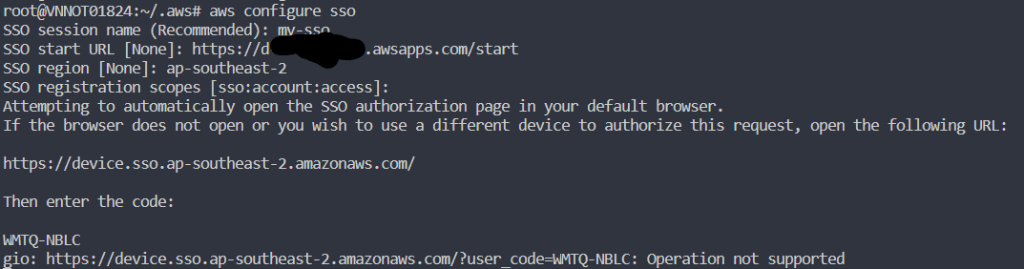
If your browser supports it, that process will open the link, or you should open it manually.

Input your user account. In this example, I will input “minh-nashtech-view-only.”

Click the “Allow” button.

Return to your console because this account has two groups, so we must choose which group to assign.
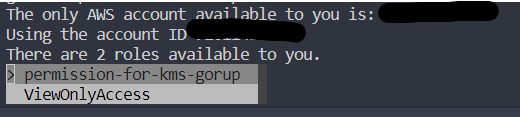
Choose “ViewOnlyAccess” and continue inputting information: client region, default output format, profile name, etc.

Run the command to check your profile.
aws s3 ls --profile view-only

Reference:


Leave a comment